
1. Upon initial power-up, the Language Settings screen is displayed on the screen. Tap Next to continue.
| System Language | Select the Controller default language displayed on the screen |
| Test Result Language | Select the Controller default language for all displayed tests and test results |
2. A Consent to Collect Data screen is displayed. Tap the Consent check box and then tap Next to continue.
3. The Date/Time Settings are displayed. Tap Next to continue after making any adjustments.
| Select Time Format | 12-hour or 24-hour format |
| Select Date Format | DD/MM/YYYY, MM/DD/YYYY, or YYYY/MM/DD |
| Select Time Zone | Time zone offset from Greenwich Mean Time |
| Set Date | Set the current date |
| Set Time | Set the current time in the selected time zone |
4. The Test Settings are displayed. Tap Next to continue after making any adjustments.
| Battery Rating | Default: Cold Cranking Amps (CCA) |
| Temperature Units | Select Fahrenheit or Celsius |
| Decimal Separator | Select decimal point or comma |
5. A listing of detected Configured WiFi networks is displayed.
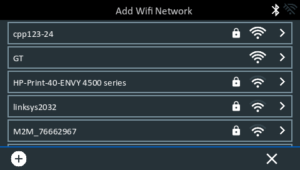
To select a network: For initial setup, no networks will be displayed here yet.
To add a network: Tap the plus (+) sign, then select from one of the displayed detected networks.
To manually add a network, tap the plus (+) sign again. Follow the on-screen instructions to select the Network SSID, Security, and IP Settings. Tap Next when finished.
Use the onscreen keypad to manually enter the Network SSID, security type, and IP settings. If necessary, enter the WiFi network password. Tap Next when finished.
A confirmation screen is displayed when the analyzer has successfully connected to the WiFi network.
To delete a network: Tap a displayed network to select it. Tap trash can icon  to delete it.
6. The tool will attempt to automatically confirm your location information. If it can confirm it, it will display your location. Press Next to continue.

If you cannot connect to the server, please contact the Honda Canada Help Desk for assistance.

7. If the location cannot be confirmed, you will be prompted to confirm your connection or to contact the Honda Canada Help Desk for assistance.
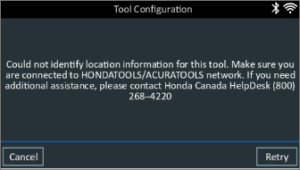
8. Next you will be prompted to confirm the location selected. If it is correct, select Yes to continue. If it is not correct, select No and the tool will go back for location selection.

9. Next you will have to set up your initial user account. Do this by pressing Add and entering the name to use.

10. Once you have created at least one user, you are then able to select Done which will take you to the login screen.
11. The login screen will appear. Pressing Start will take you to the main menu to begin testing.
